Non-Bike Items
We work hard to make sure that your items are delivered quickly and securely. In stock, non-bike items ordered before 10:30am will be picked and packed the same day. You will recieve notifications by either text or e-mail to confirm your order, and once the item has left us you will be given a tracking number. We despatch items Monday-Friday, which aim to be delivered within 1 business day.
On occasions, we have to order your items from our suppliers, which will take a little longer. You should receive an estimated delivery date with your order confirmation, however sometimes within the biking industry there are unexpected delays, and we will keep you updated on the progress of your order.
We try our best to be environmentally friendly here at We Cycle, and part of that is recycling packaging that can be used again. So please accept our apologies if your parcel looks like it's been used more than once - it probably has.
*Free Delivery on any non-bike orders over £100
Bike Delivery
All bikes will undergo a pre-delivery inspection before they are packed safely ready to be collected by our couriers. You will be notified once the inspection and packing has been completed and then again we will contact you with tracking details once the bike is collected. If you have any special requirements for the bike please contact our Llandudno Junction store to discuss. Bikes often need to be adjusted to allow them to fit inside a box that meets the couriers specifications, so some basic adjustments may need to be carried out when the bike arrives. This will usually be fitting the seatpost, pedals, and straightening the handlebars. If you are in any doubt about making any of these adjustments then please contact the store, as although straightforward, it is important these items are all fitted and tightened correctly.
If you live near enough then we offer a more personal delivery service where one of our staff will deliver the bike in person, fully assembled and completely ready to ride. This service depends on location and driver availability so please call the store to discuss further.
How To Assesmble Your New Bike
Whether you’ve purchased a bike from us, or curious about what’s involved during the delivery process, you can rest assured knowing your new bike will be packaged with care and arrive with minimal assembly required.
Once you have placed your order, one of our experienced mechanics will begin building your new bike. This process will involve a rigorous Pre-Delivery Inspection (PDI), where we will test all functionalities before delivery, so that you can start pedalling right after the assembly at home. Your bike will then be carefully re-packaged ready to be posted to you. After the build process your bike may no longer fit in its original box provided by the manufacturer, and may be repackaged into another box, so don’t be alarmed if the name on the side of the box doesn’t match your bike.
When your new bike arrives with you, follow the steps below, and you’ll be out on two wheels in no time! If you run into any issues, or have any queries regarding receiving a bike from us then please contact us on 01492 593811, or email us using sales@wecycle.co.uk.
Tools for Assembly/Adjustment
To assemble your bike, you’ll only need a few tools:
- Combo Torq wrench and bit set (supplied with your bike)
- 15mm pedal wrench (not supplied with your bike)
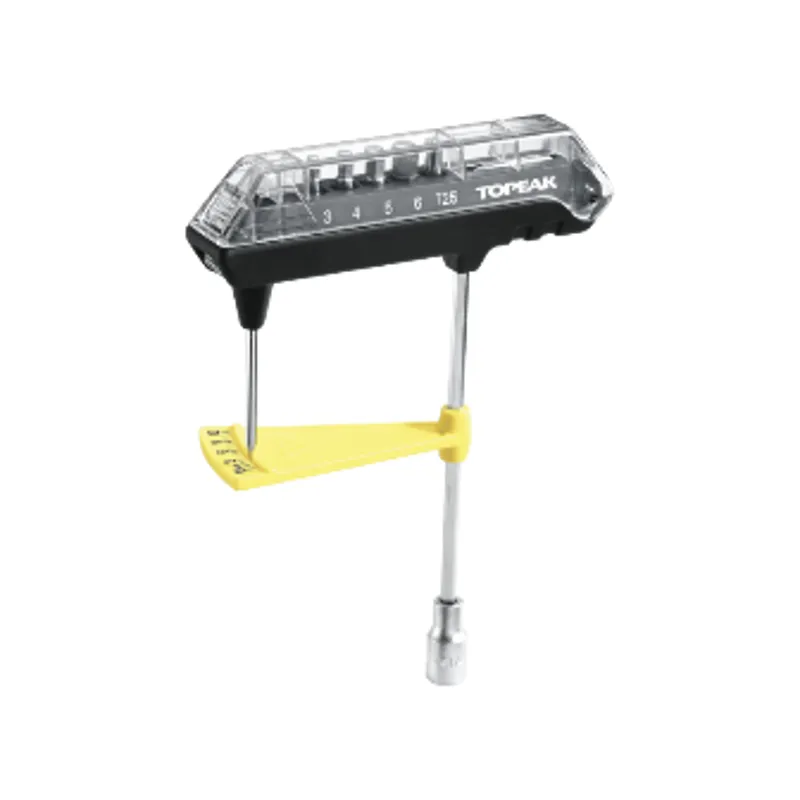
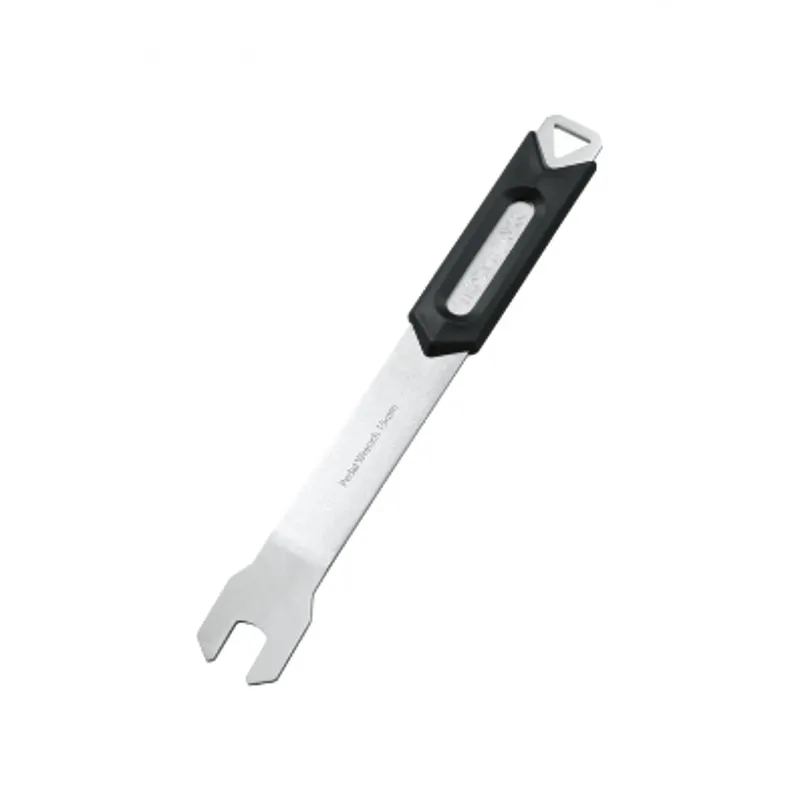
Topeak Combo Torq wrench and bit set 15mm Pedal wrench
Depending on the box used to package your bike, you may also need scissors/utility knife to cut any tape.
Opening & unboxing
The first step is to open the top of your bike box. The box may be sealed using packaging tape, so carefully use scissors/utility knife to cut any tape. Please take care not to cut too deep into the box, as this may damage your new bike. When you open your box, please also beware of any packaging staples within the cardboard. Next please remove the Accessory box. This accessory box will include a Topeak Combo Torq wrench & bit set, and may include other items such as: documentation, warranty card, pedals, e-bike charger, etc. At this point, also remove any packaging material that is preventing the bike being able to be removed. In some cased the accessory box / boxes may be on the bottom of the box, so remove this after the bike.
Removing the bike
Using care, lift your bike up and out of the box. If the bike is too heavy, then please get someone to assist you at this time.
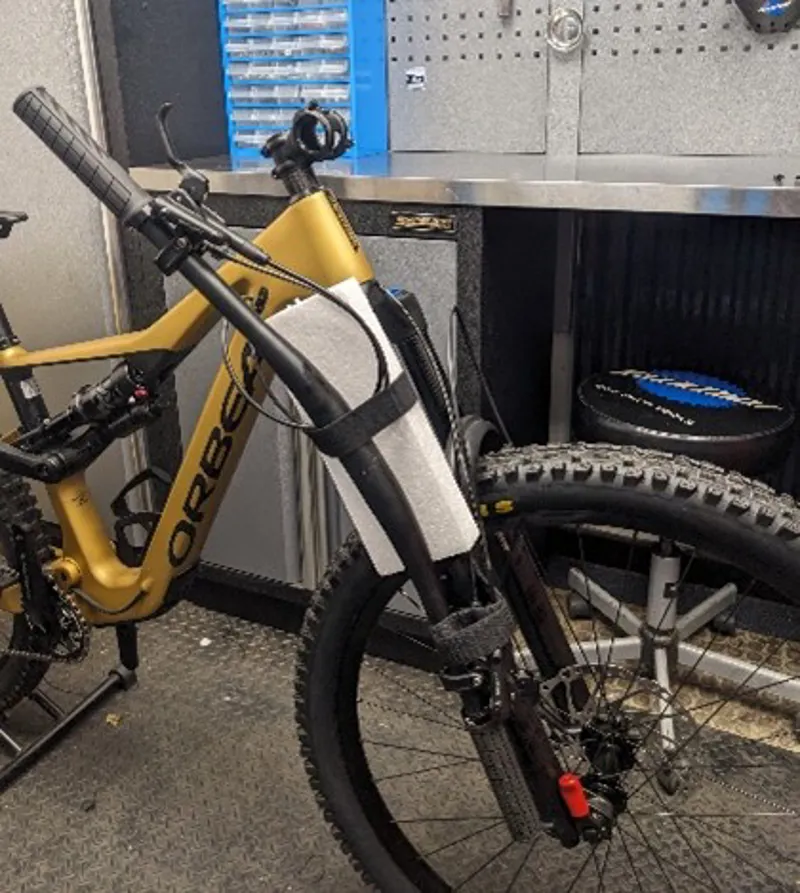
Now you get to properly see your new bike for the first time! Remove any tape and foam packaging which protects your bike during the delivery process.
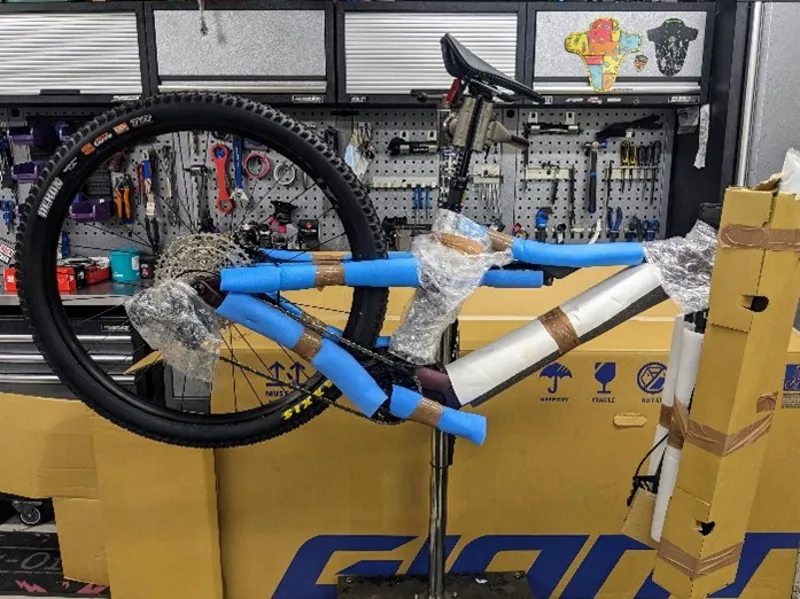
Here is an example of what your new bike might look like once you have removed it from its box.
Installing your front wheel
In some instances, it may not be possible to deliver your bike with the front wheel installed. If this is the case, you will need to install the wheel to get out riding. For a step-by-step guide on how to install your front wheel, please click here to see our YouTube video.
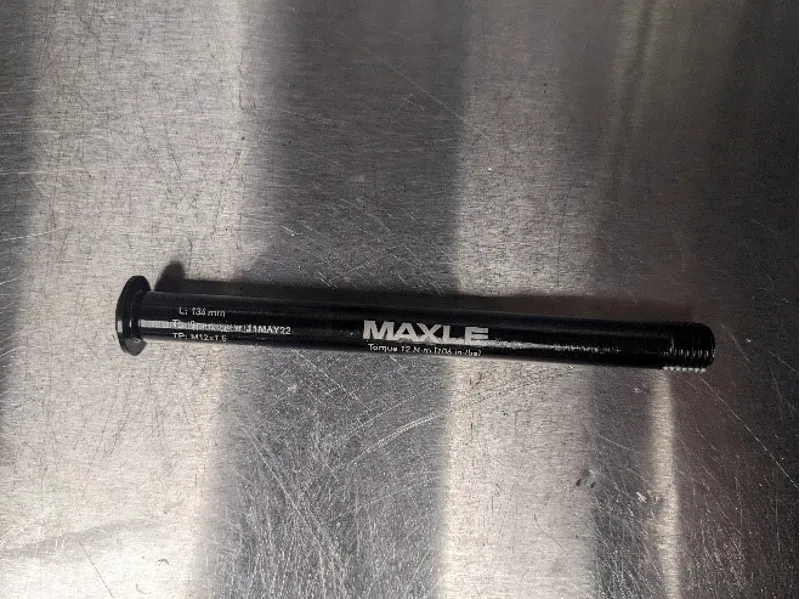
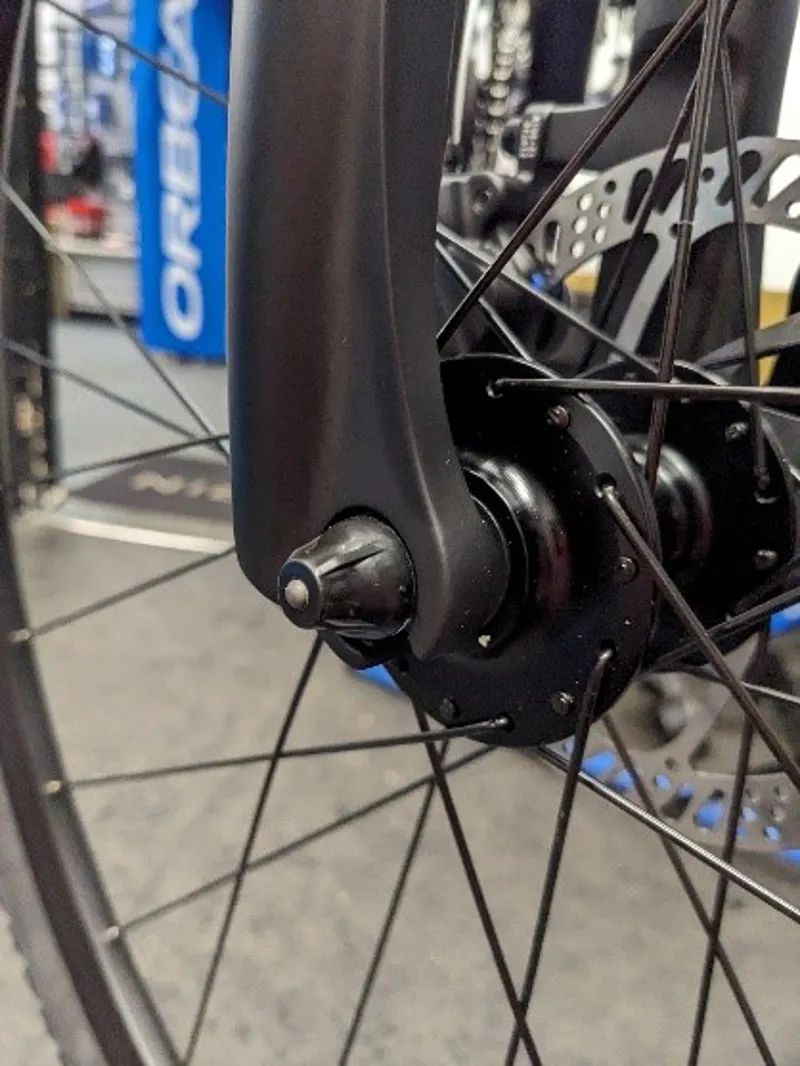
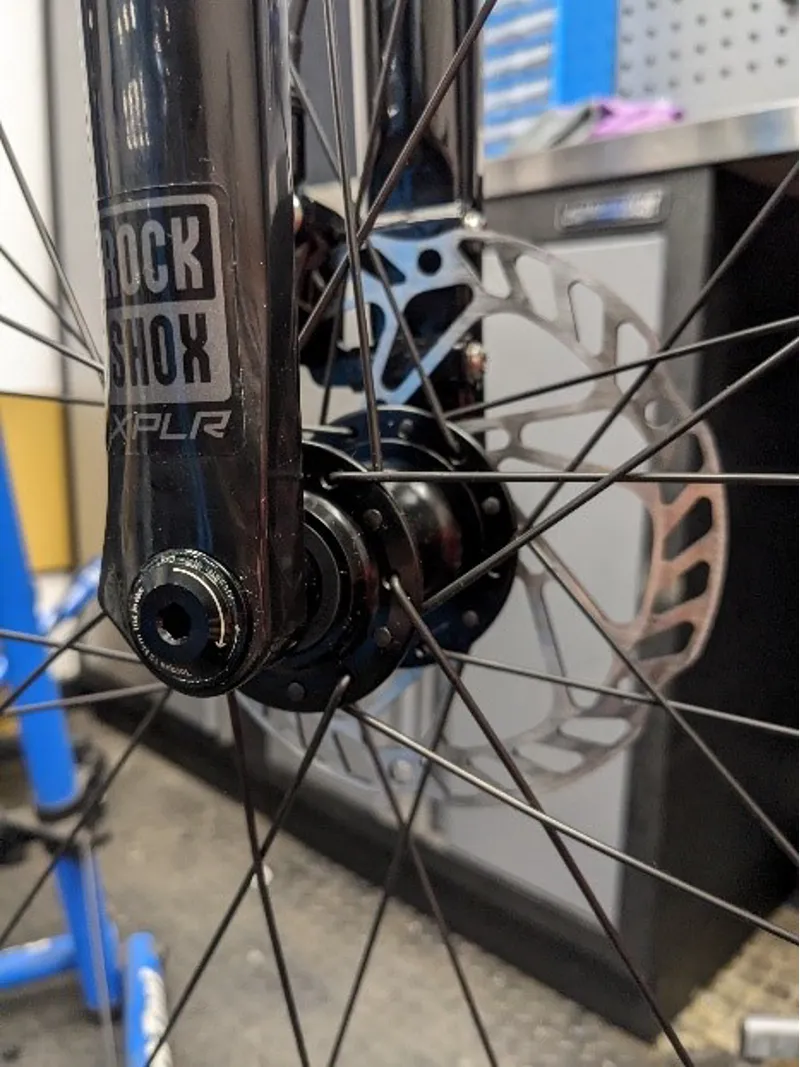
There are two different types of axles which are used to secure your front wheel to your bike: Thru-axle and quick release skewer. A Thru axle will be thicker in diameter (usually 10-20mm) and will thread directly into your fork. Quick release skewers on the other hand, are narrower and thread through your wheel hub, secured by a nut on the threaded end of the skewer. Please see below the images of each to identify which type you have and follow the associated steps.
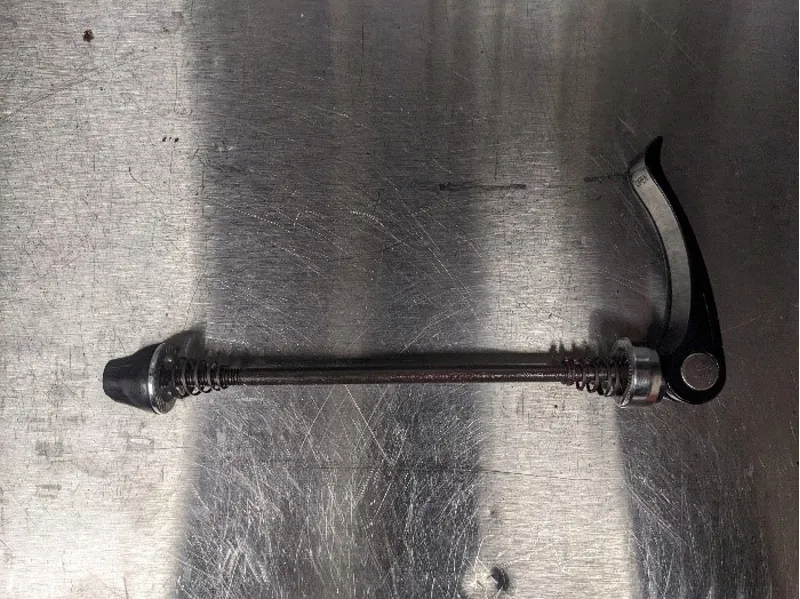
Quick release skewer Thru axle
Quick release skewer:
1) Remove the nut and conical spring from the treaded side of the skewer.
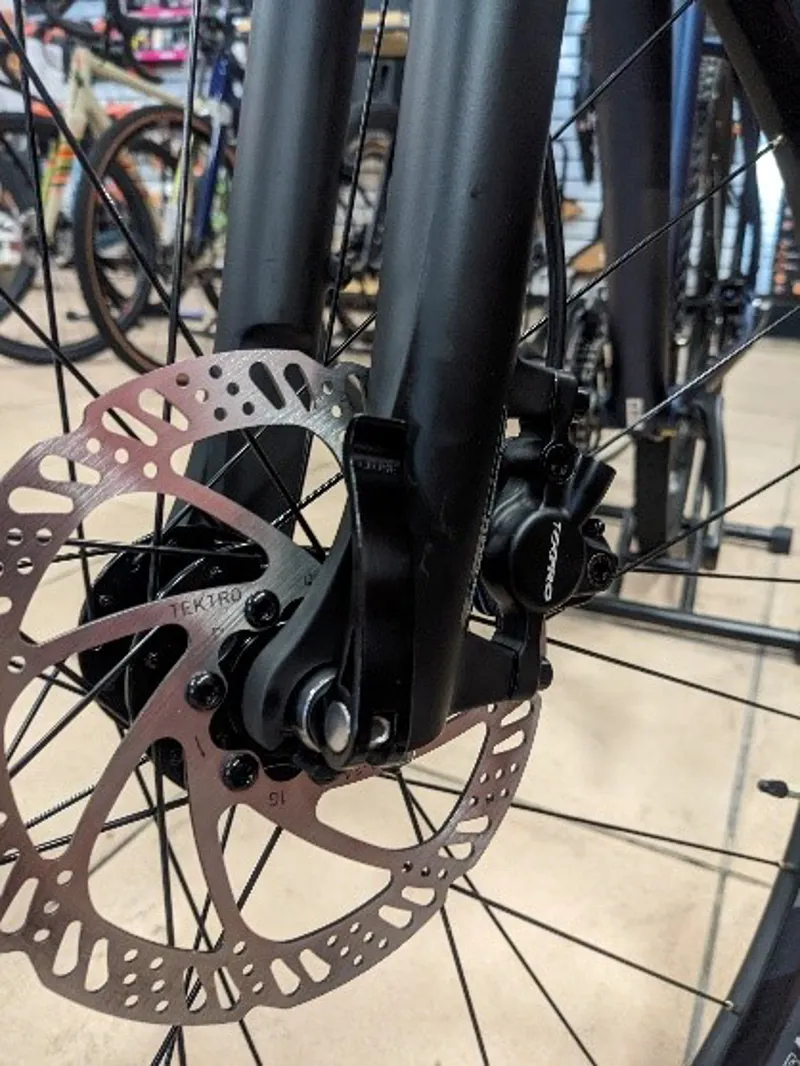
2) Place your front wheel into the fork, ensuring it is rotated correctly. There will be rotation markings on the sidewall of the tyre, making it clear which way the wheel fits into the fork. If you have purchased a disc brake equipped bike, you may need to remove a coloured spacer from between the brake pads, simply pull on the coloured spacer and it should remove itself. The fork should rest on the edges of the wheel hub.
3) Insert the skewer from right to left, through the wheel hub.
4) Add the conical spring back onto the skewer. Then thread on the nut, securing the axle. Hand tighten the nut using the quick release lever.
5) Finally, close the quick release lever, it should be firm to close, but not so tight that it becomes a challenge to close.
Thru-axle:
1) Unthread and remove the thru axle from the fork.
2) Place your front wheel into the fork, ensuring it is rotated correctly. There will be rotation markings on the sidewall of the tyre, making it clear which way the wheel fits into the fork. If you have purchased a disc brake equipped bike, you may need to remove a coloured spacer from between the brake pads, simply pull on the coloured spacer and it should remove itself. The fork should rest on the edges of the wheel hub.
3) Insert the thru axle through the side of your fork, and through your hub. Then thread the thru axle into place. You will either need to use a 5/6mm Allen key or quick release lever to do this. Tighten until hand tight.
6) If your axle has a quick release lever, you will need to close this to secure the axle. It should be firm to close, but not so tight that it becomes a challenge to close. If your axle requires an Allen key, then ensure it is secured firmly (approximately 10-12nm).
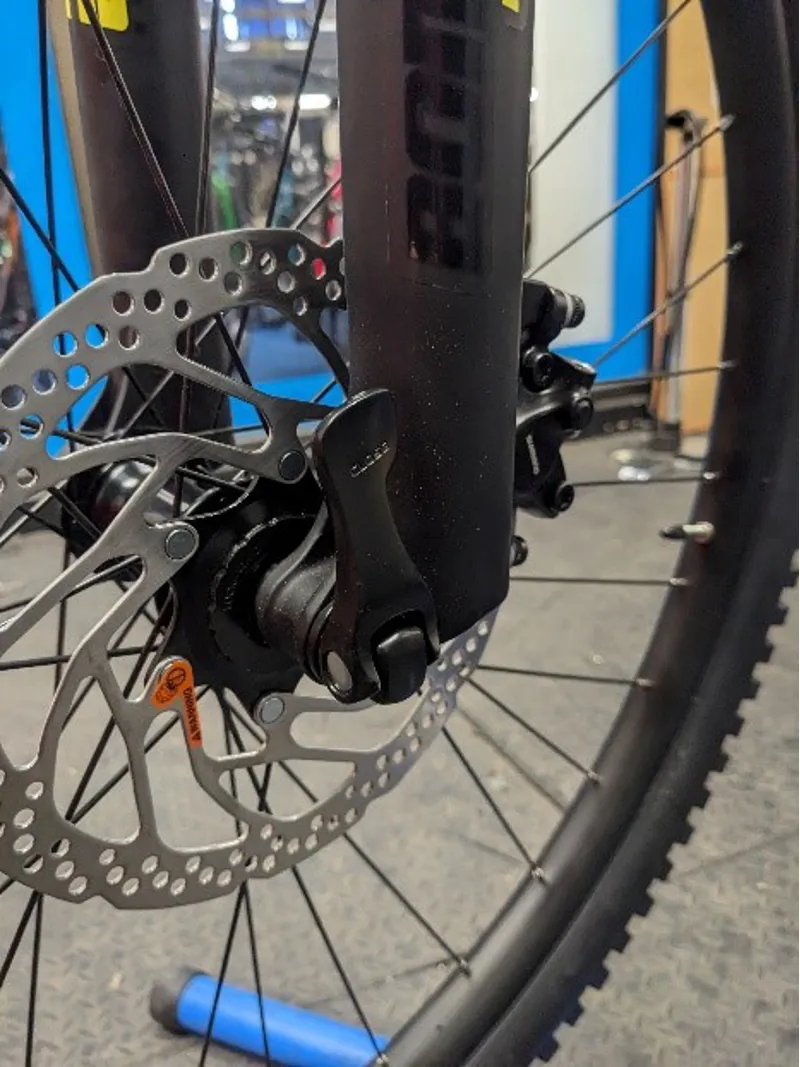
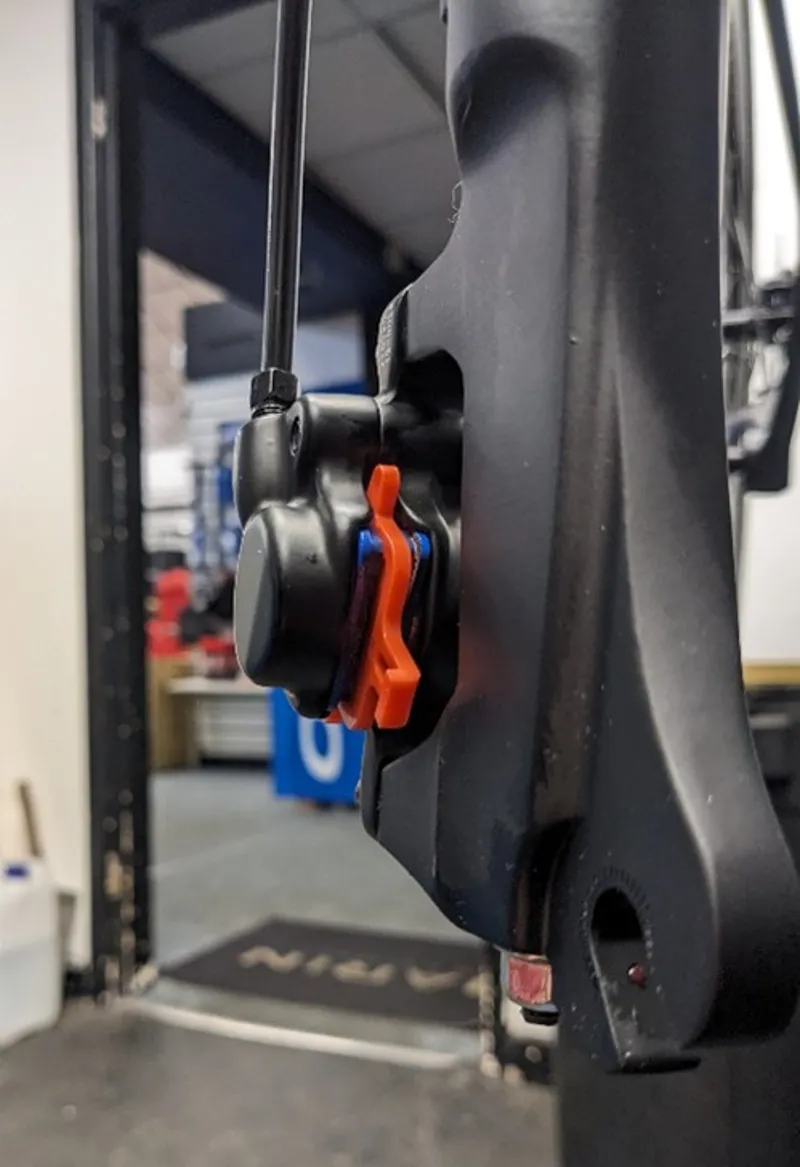
An example of the coloured spacer which may need to be removed before the wheel can be installed. This spacer prevents the brake pads from contacting each other when the wheel is not fitted.
Adjusting your handlebars
Depending on the type of bike you have ordered the handlebars may be secured differently, and will require different adjustments. Please follow the steps for category of bike you have ordered:
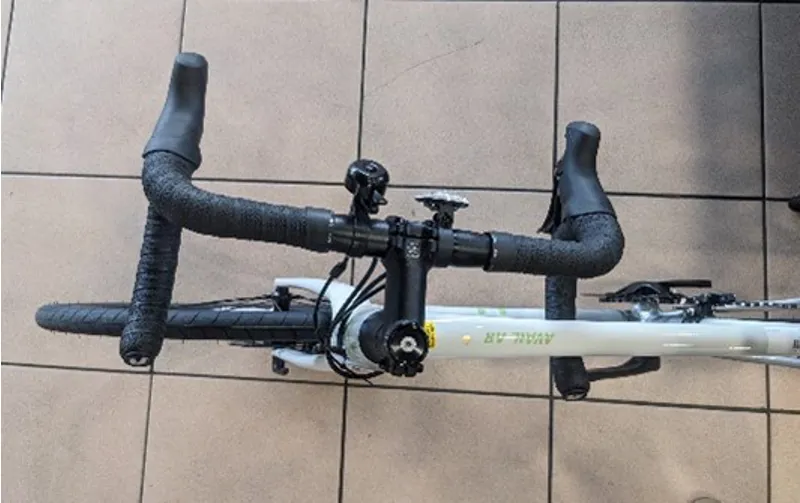
- Road or gravel Bike (drop handlebar bikes): For delivery your stem will have been rotated 90 degrees, your handlebars will have been rotated so they hook onto your top tube, and your handlebars may be set off-centre. The image below illustrates this. To set your bars up correctly:
1) Take the supplied combo Torq wrench and remove it from its packaging.
2) Open the plastic cover located on the top of the wrench, remove the correct size bit, and place it into the socket located at the bottom of the wrench. Stem bolts typically require 4 or 5mm hex bits, to check which one you need, take them from the wrench and place each size into the stem bots. The one that fits is the one you need!
3) Now loosen the two stem pinch bolts (located at the back of the stem, furthest from the handlebar), and loosen the four stem face-plate bolts (which attach the handlebars onto the stem).
4) You should now be able to move the stem and handlebars freely. Rotate the stem so it is in line with the front wheel of your bike. Now tighten the stem pinch bolts, this will secure the stem in place. Tighten the bolts to the torque printed on the stem, this is typically between 4-6nm. For example, if you needed to tighten the bolt to 6nm, you would slowly tighten the bolt until the needle on the Torq wrench reached the 6 mark on the yellow torque indicator. Tightening to the correct torque is essential as it ensures your bike is safe to ride, and prevents damage from over-tightening.
5) Now the stem is in the correct position, the handlebars need to be set. Ensure that the centre of the handlebars is in line with the centre of the stem faceplate. Now rotate the handlebars so the flat end of the bar is perpendicular with the ground. Tighten the (usually 4) bolts evenly in a cross pattern (bottom left & top right, bottom right & top left). If you do not find a "No-Gap" label, make sure there is an even gap between the face plate and the stem body. Ensure to tighten to the correct torque specs.
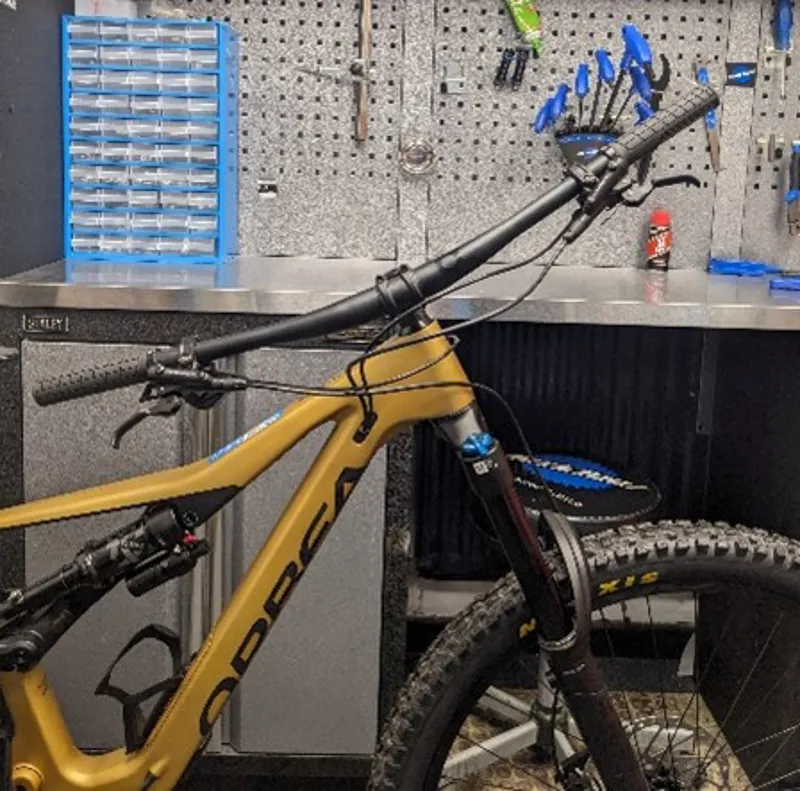
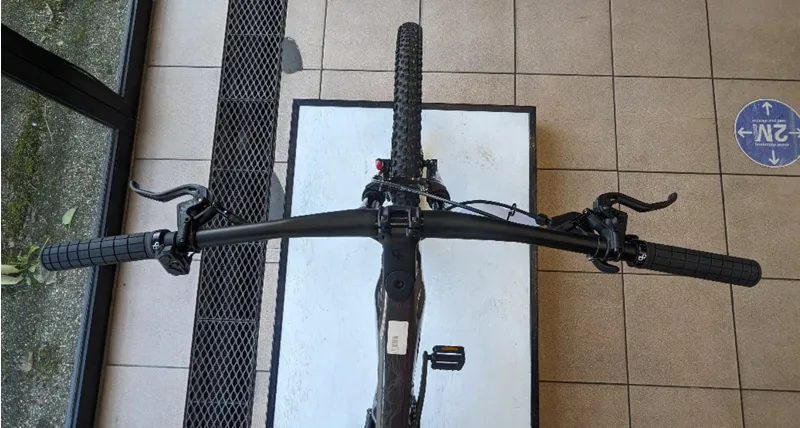
- Hybrids, mountain bikes and e-bikes (flat handlebar bikes): For delivery your stem will have been rotated 90 degrees, and your handlebars may have been removed. The images below illustrate this. To set your bars up correctly:
1) Take the supplied combo Torq wrench and remove it from its packaging.
2) Open the plastic cover located on the top of the wrench, remove the correct size bit, and place it into the socket located at the bottom of the wrench. Stem bolts typically require 4 or 5mm hex bits, to check which one you need, take them from the wrench and place each size into the stem bots. The one that fits is the one you need!
3) Now loosen the two stem pinch bolts (located at the back of the stem, furthest from the handlebar), and loosen the four stem face-plate bolts (which attach the handlebars onto the stem).
4) You should now be able to move the stem and handlebars freely. Rotate the stem so it is parallel to the front wheel of your bike. Now tighten the stem pinch bolts, this will secure the stem in place. Tighten the bolts to the torque printed on the stem, this is typically between 4-6nm. For example, if you needed to tighten the bolt to 6nm, you would slowly tighten the bolt until the needle on the Torq wrench reached the 6 mark on the yellow torque indicator. Tightening to the correct torque is essential as it ensures your bike is safe to ride, and prevents damage from over-tightening.
5) Now the stem is in the correct position, the handlebars need to be set. Ensure that the centre of the handlebars is in line with the centre of the stem faceplate. Now rotate the handlebars so the flat end of the bar is perpendicular with the ground. Tighten the (usually 4) bolts evenly in a cross pattern (bottom left & top right, bottom right & top left). If you do not find a "No-Gap" label, make sure there is an even gap between the face plate and the stem body. Ensure to tighten to the correct torque specs.
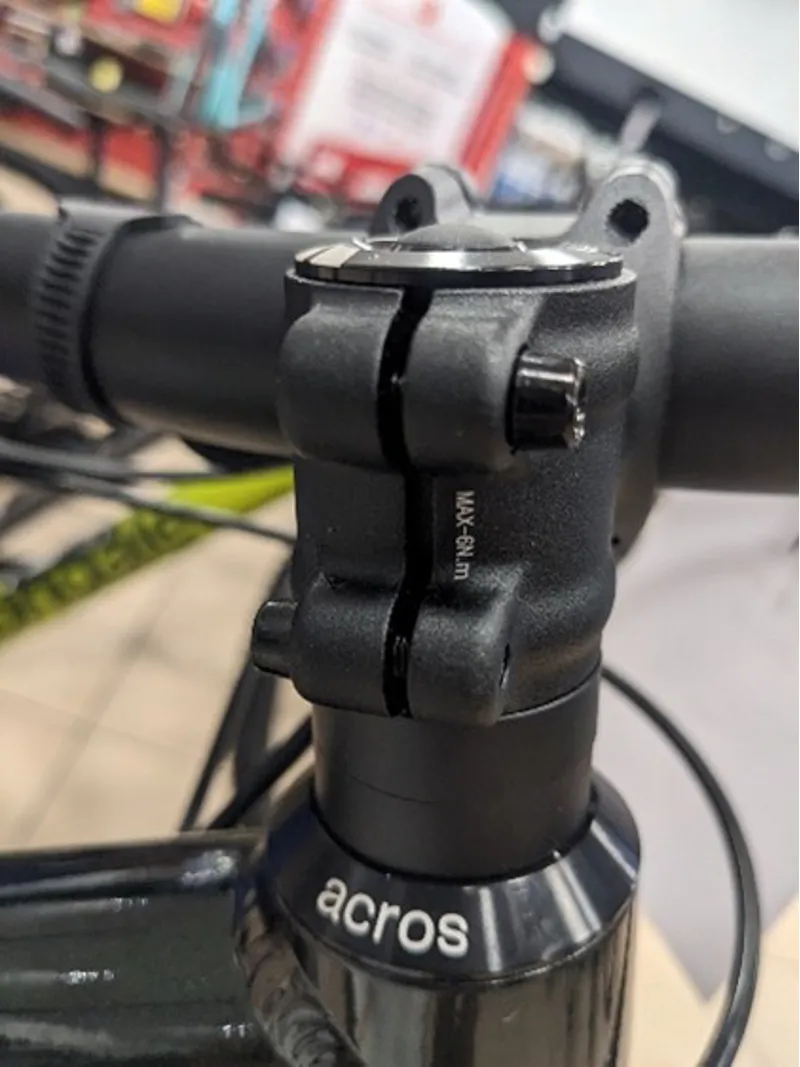
Here is an example of the two stem pinch bolts which will need to be adjusted so your stem can be correctly rotated. The recommended torque specs are shown by the white writing in-between the pinch bolts. Please not that this may look slightly different on your bike.
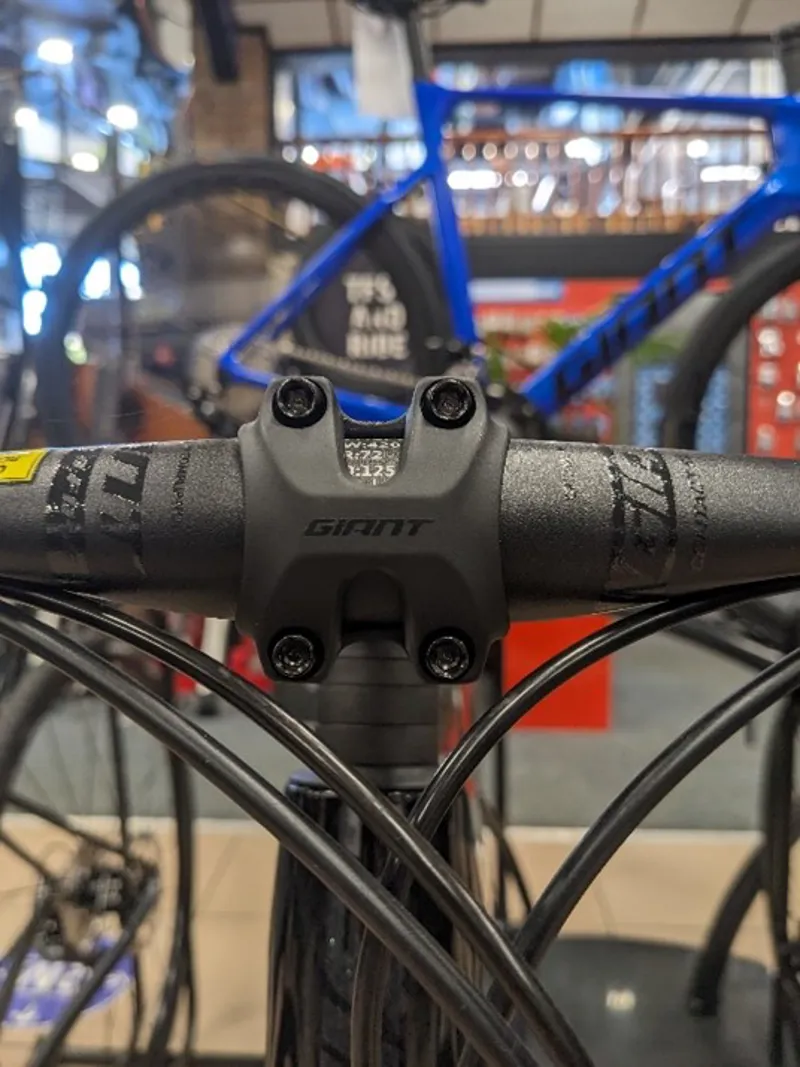
These are the four face plate bolts which will need to be adjusted for the correct setup of your bike. Use any markings on the handlebar to ensure it is centred correctly.
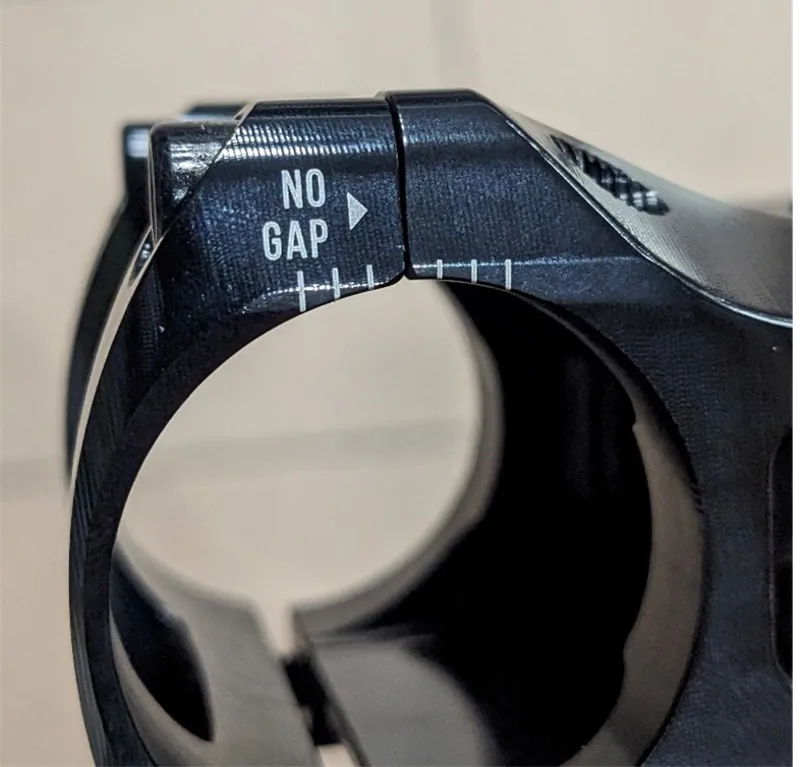
This is where the ‘no gap’ marking will be if your stem is required to be set up this way.
This is what your handler should look like when it is correctly set up.
Installing pedals
Please note that for this step some user-supplied parts will be required. Pedals being included with the bike is model specific, with pedals typically needed to be purchased additionally. This is common across the industry, as often the type of pedal desired is personal preference.
Pedal threads are different from the left to right side. The right-side pedal has a right-hand thread (removes anti-clockwise, installs clockwise). The left-side pedal has a left-hand thread (removes clockwise, installs anti-clockwise). Often the pedals will be stamped with an ‘L’ and ‘R’ to denote the left and right pedal, respectively. A useful way to remember this is the pedals thread onto the crank in the same direction the wheels move when the bike moves forward.
Using your fingers, thread the right pedal onto the right crank, ensuring the threads are lined up. The pedal should thread on easily, if you feel any resistance or stiffness STOP, as you may be cross threading the cranks. Remove the pedal, check alignment, and try again. Once the pedals are on finger-tight, use the pedal wrench or Allen key (this is pedal dependant) to tighten the pedal. Most entry-level pedals will require a pedal wrench, with more premium pedals tightened using a 6/8mm Allen key. You can use the opposite crank arm for leverage. Repeat process for left pedal, but remembering to thread the pedal anti-clockwise.
For more information on installing pedals, we have a video on our YouTube channel which explains this process step-by-step. Click here to view it.
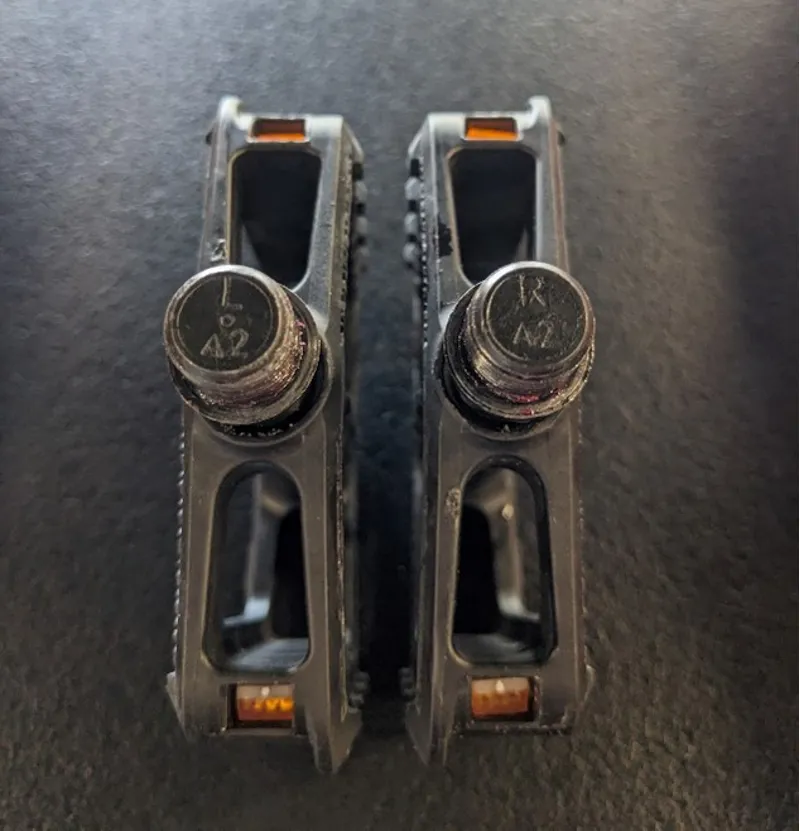
Your pedals may have left (L) and right (R) markings on the threaded part of the pedal, however not all pedals do. In this case, use any branding on the pedal to ensure you are fitting it onto the correct side of your bike.
Saddle height adjustment
The final step is to adjust your saddle height to the correct height. Seat posts are secured using either a quick release lever, or with a bolt (4 or 5mm). Saddle height can be adjusted using the following steps:
1) Open the seat clamp using the quick-release lever, or by loosening the bolt.
2) Pull up the seat to roughly hip height and tighten it moderately. If the camp uses a lever, then it should close nice and firmly. If the camp uses a bolt, then tighten it to the specified torque spec (usually 5-8nm), it should be printed on the seat clamp.
3) Saddle fore aft and tilt can usually be adjusted using a 5 or 6mm Allen key on the underside of the saddle.
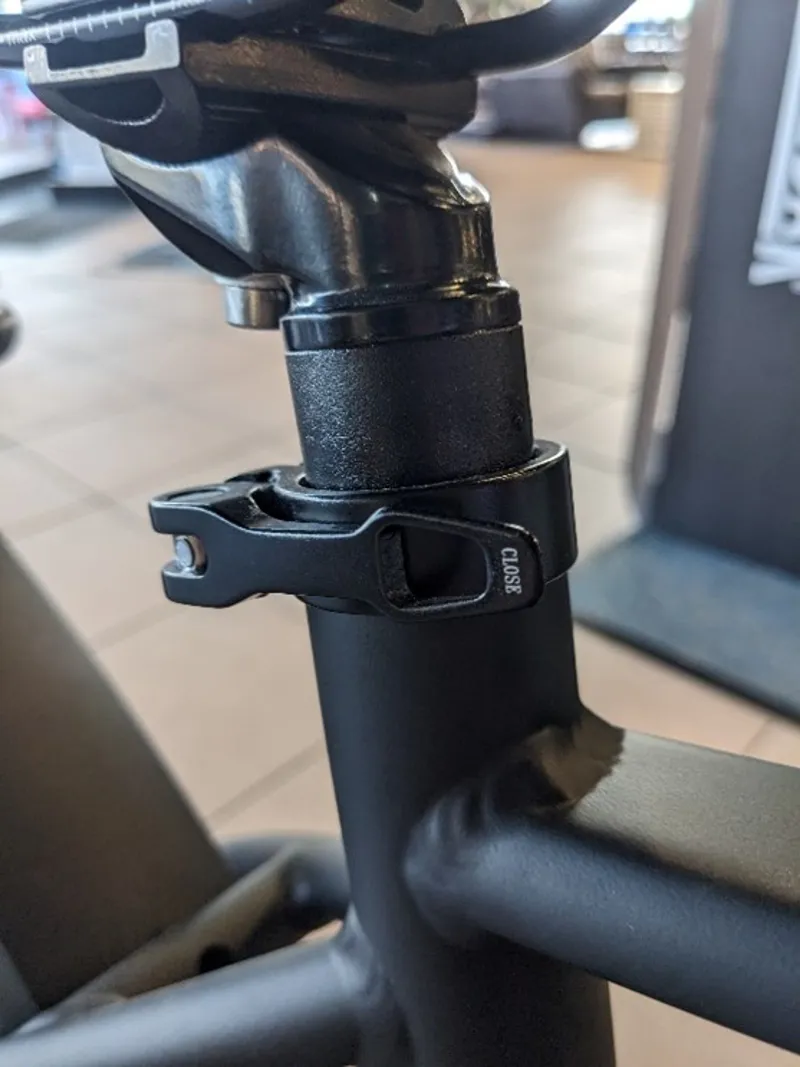
This is what a quick release seat post clamp looks like.
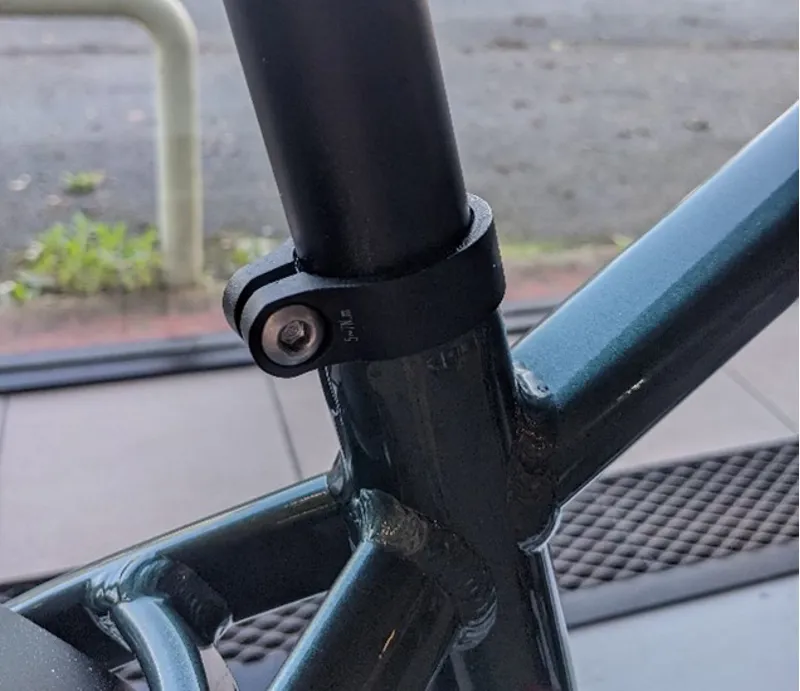
A bolt seat clamp looks like this. Seat height will be adjusted using either a 4 or 5mm Allen key.
Pre-ride checks
Before every ride make sure to check that the bike is safe to ride: the brakes & gears work, bolts are tight, and your tyres are inflated sufficiently. All that’s left is to go out and enjoy your new bike!